Introduction
Overview
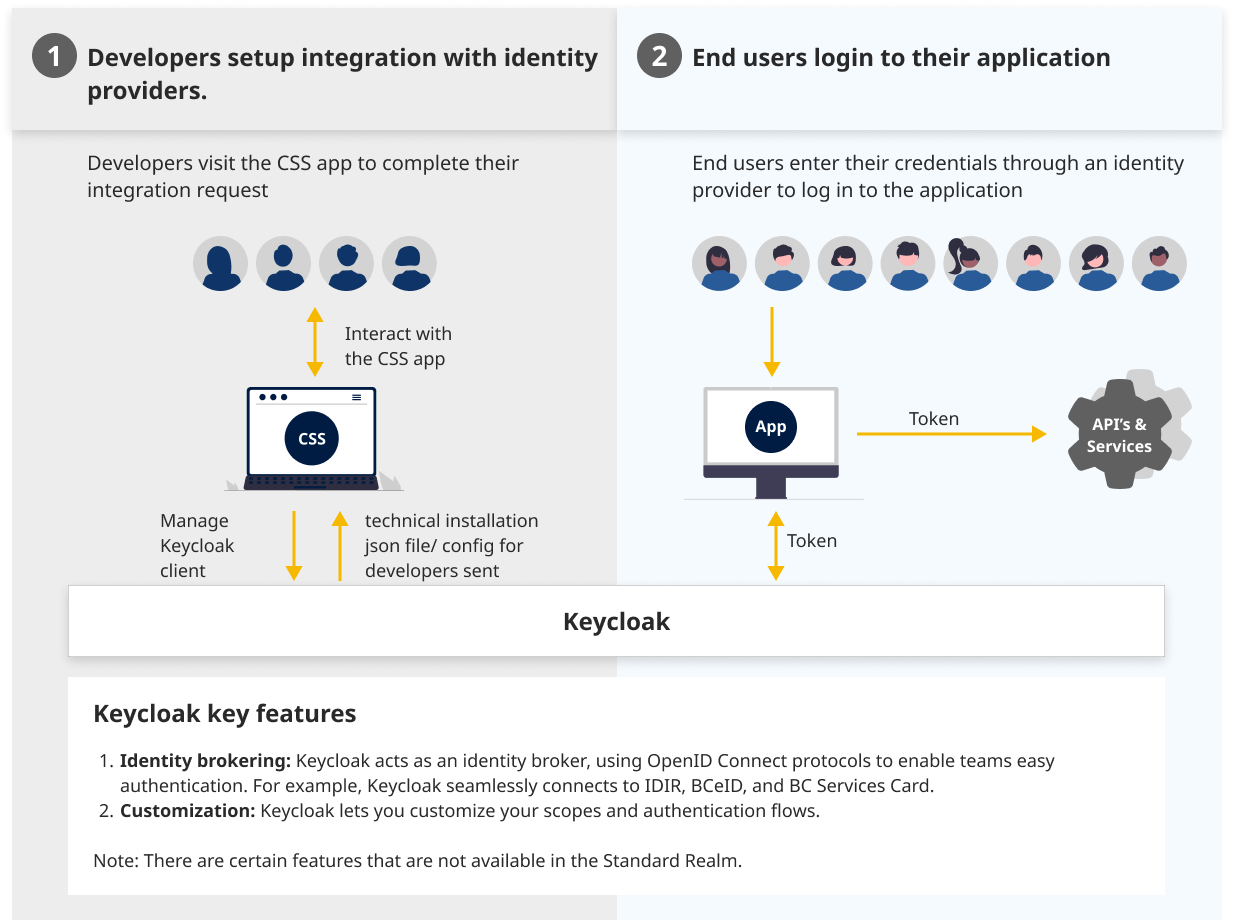
The Common Hosted Single Sign-On (CSS) self-serve portal is built by SSO team. It provides BC Government digital product teams to request and manage integrations with supported identity providers (IDPs) without building or operating their own authentication infrastructure.
Standard Service
The CSS creates and manages clients within the Standard Realm — a shared Keycloak realm centrally operated by the SSO team. The Standard Realm is pre-configured with settings suitable for the majority of BC Government applications, so teams do not need to manage realm-level configuration themselves. When an integration request is submitted through the CSS, a client is automatically provisioned in this realm. Each client is fully isolated within its own set of credentials and redirect URIs.
The CSS was built to abstract away the complexity of the native Keycloak Admin UI. Rather than requiring teams to learn Keycloak's interface, the CSS provides a focused, purpose-built experience for the most common integration tasks:
- Manage identity providers
- Setting allowed redirect URIs and roles
- Managing team members and their access levels
- Promoting integrations across environments (Development, Test, Production)
- Retrieving client credentials securely
Accessing the CSS
The CSS is fully self-serve and accessible to BC Government teams. Before getting started, confirm the following with your product owner or technical contact:
Prerequisites:
- An IDIR account with MFA enabled
- A role of product owner, product admin, or team lead on the project
Once you have access, you can submit an integration request directly through the CSS. Provisioning is automated and typically completes within minutes. After provisioning, your client credentials — including the client ID and, for confidential clients, the client secret — are available securely within the CSS.
Raising an Integration request
- Sign in to CSS
- Click on
+ Request SSO Integration - Under
Requester Info- Add
Project Name:, example: Driver's Licensing Portal - Choose the categories of the user base using your application
- Optionally create or select a team
- You need to be a product owner or technical contact to proceed further, if yes click
Next
- Add
- Under
Basic Info- Select
Protocol.OpenID Connectis recommended for most applications as it is modern and popular - Select
Usecase. Follow this guide to choose right option - Select
Client Type. Follow this guide to choose right option - Choose appropriate
Identity Providers - Choose right
Environments. Note:Developmentenvironment is mandatory and cannot be unchecked - Enter
Additional Role Attribute, an optional claim that holds roles assigned to the user. This is useful if your application expects a custom claim name instead ofclient_roles. Note: This is not available for SAML integrations - Click on
Next
- Select
- Under
Development- Use this guide to customize default login page
- Add your application URI(S) under
Redirect URIs - Normally you do not require to modify additional settings but just in case you need to then contact SSO team
- Click
Next - Repeat above steps for other environments
- Under
Terms and Conditions, read all the Terms Of Use (TOU) and checkI agree to the Terms and Conditionsand clickNext - Review your integration information and click
Submit
BC Services Card
When you opt-in for BC Services Card identity provider, its expected that you have received formal go-ahead from that team and the last step to configure this IDP is through CSS.
After you select BC Services Card under Identity Providers(S), you have to choose Privacy Zone and Attributes. Please refer to this guide for more information on privacy zones. If you further need assistance, please reach out to IDIM team