Administration Guide
The Document Management Service (DMS) provides capabilities to store and retrieve unstructured data objects including documents, spreadsheets, images and spatial files. It also allows for indexing and full-text searching of objects stored in the DMS.
It is important to distinguish between the DMS and the DMS-API. At the beginning of every project, there are DMS set-up tasks that must be performed. Those DMS set-up tasks are described in this document. Programmers deal primarily with the DMS-API which is described in more detail in the DMS Developer Guide.
Oracle WebCenter Content
DMS functionality is provided by a commercial product - Oracle’s WebCenter Content (WCC). This Oracle software is proprietary and costly to license and maintain. The version of Oracle WCC used to implement the DMS is no longer supported by Oracle
In the future, IIT may replace Oracle WCC with an open source document management system. This is possible because the DMS-API is a REST Web service that “hides” the complexities of Oracle’s WCC product from consumers of the DMS-API. As long as the replacement for WCC provides all of the capabilities provided by the current version of the DMS-API, a change in underlying technologies (i.e. swapping WCC for an open source product) would be transparent to applications that connect to the service at the API level.
To administer the DMS, familiarity with the following aspects of WCC is required:
-
The DMS folder structure;
-
The DMS security model;
-
Basic operations of the Oracle WebCenter Content (WCC) product.
Folder Structure
The Oracle WebCenter Content (WCC) folder structure must be preconfigured for business areas. This ensures that documents are stored in a consistent manner that conforms to the Province’s records management policies. Documents stored within the DMS must be accessible for Records Management, FOI, and legal discovery requests.
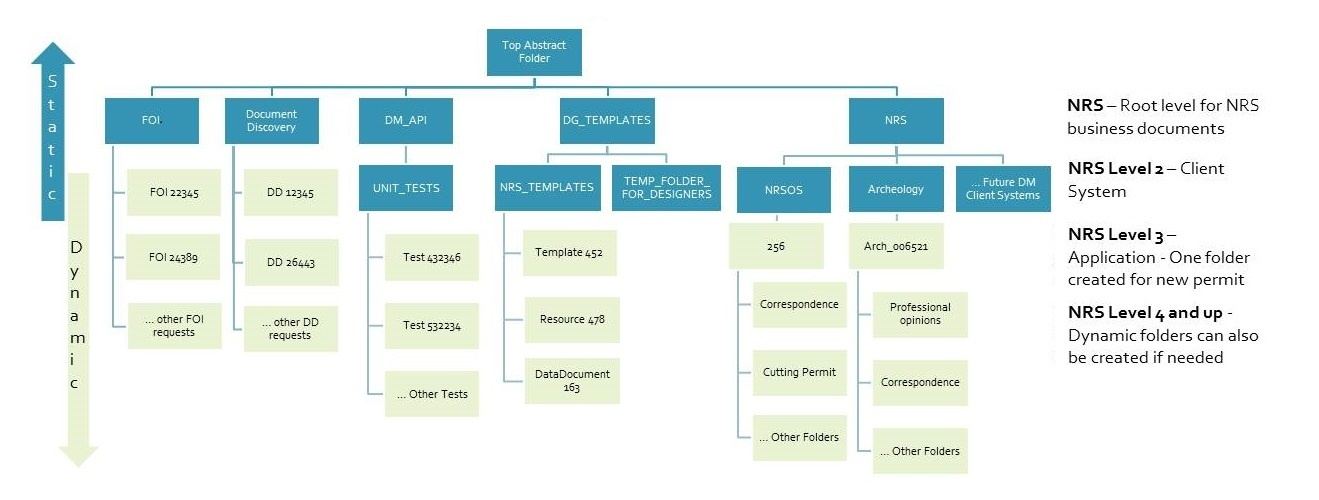 Figure 1- DMS folder structure
The DMS folder structure consists of static folders and dynamic folders. Dynamic folders can be modified to meet the needs of individual line-of-business clients.
There are muliple levels of folders used by the DMS:
-
Root folders: Top level static folders for Natural Resource business documents
-
Source System folders: used to segregate and secure documents by line-of-business (LOB)
-
Engagement folders: used solely by applications launched from within the Natural Resource Online Services (NRSOS) portal
Root Folders
Not all Root folders can be viewed with the DMS-API. Only the folders NRS, DG_TEMPLATE, and DM_API are browsable using the DMS-API. Root folders that are used by NRM Records Management staff are only viewable using the WCC console. Once created Root folders cannot be edited.
Root folders currently defined include:
- FOI: Stores all FOI folios. These folders are only visible only in the WCC console;
- DOCUMENT_DISCOVERY: Stores all folios and files used for document discovery. This folder is visible only in the WCC console;
- DM_API: Reserved for testing purposes. This folder is not present in the Production environment;
- DG_TEMPLATES: Contains documents used by the Document Generation API;
- NRS: The root level folder for all documents created by business areas within the Natural Resource Ministries. Subfolders are to be specified by Business Analysts as new business areas adopt the DMS;
- NRSOS: Used solely by the NRSOS portal.
System Source Folders
Source System Folders exist to separate and secure documents by line-of-business (LOB) or by DMS client system. A Source System folder should be created for each new client. These folders are defined by the Business Analyst and implemented by the Administrator. There are several System Source folders that hold shred objects including:
-
NRS_TEMPLATES: Stores templates and other files needed to generate documents. The Template Designers maintain the contents of this folder through a portlet. This folder could be open to most staff users without limitations depending on which LOBs they belong to.
-
TEMP_FOLDER_FOR_DESIGNERS: Stores temporary files needed when generating documents, as well as the documents generated by the Template Designers during testing.
-
UNIT_TESTS: Used for testing. To validate the WCC implementation, the security, and the DM API it’s necessary to create and delete many documents via unit and integration tests. This folder exists to ensure the test documents do not corrupt the main repository.
-
In order to add a new business client to the DMS, you will need to create Source System folders beneath the Root folder within WCC. The request for a folder, a, should be specified by a Business Analyst. The Business Analyst request should include the folder name, security roles and associated metadata.
Dynamic Folders
Folders can be created dynamically under the static Source Systemfolders. When a dynamic folder is created, the file metadata and roles can be specified programmatically for each file stored in the folder. Sample file metadata and roles set for a dynamic folder might include:
-
OCIOClassification = PROTECTED B [metadata]
-
RecordManagementClassification = NRM-102901 [metadata]
-
GeneralVisibility = InternalOnly [metadata]
-
StaffVisibility = DMS.STAFF_USER_READ [role]
WCC Operations
See: Metadata Reference
A Business Area Example
In this example, a new line-of-business (Mines) has a requirement to use the DMS. The following tasks must be completed:
- A new Source System folder named Mines is created under the Root folder NRS.
- A set of security roles specific to the Mines business area are defined in WebADE. These roles determine who will be authorized to access Mines folder (and sub-folders) in the DMS
- Mines application that use the DMS will need to be assigned to a WebADE profile that has been granted the WebADE roles for the Mines Source System folder in DMS.
Using Oracle’s WebCenter Content (WCC)
Create a New Folder in WCC
- Open Oracle WebCenter Content and log in as the administrator.
- In the Browse Content pane, expand Folders and select the Root folder where you want to create the Source System folder.
- Expand the Add menu and select New Folder.
- On the Folder Creation dialog box, enter a name for the folder and then click show advanced options.
- Create the folder, setting the security roles(s) specified in the Business Analyst request.
- Click Create. Once the folder is created, set the default metadata for the folder.
- Expand the Edit menu and select Metadata Values.
- Enter the metadata provided by the Business Analyst in the metadata dialog box.
- Click Save.
Configure DMS Security in WebADE
There are several DMS preferences that you can configure in WebADE. If the update you are making impacts other services and/or components, you must time it to a release.
Follow these steps to configure the Document Management preferences:
- Update the Document Management preference in the WebADE database via a script.
- If you make a code change to the API or portlet, redeploy the API and/or portlet using Jenkins.
- If the change is to a component preference, restart the related component in WebLogic. If the change is to a global preference, restart WebLogic. This restarts all components and the portal.
The following table lists the Document Management preferences you can configure, the component using each preference, and a description.
| Component | Preference Name | Description |
|---|---|---|
| dm.rest | engagementFoldersRoot | Main Root folder where source system folders, engagement folders, and files can be created |
| dm.rest | rootFolders | Root folders that can be seen by the DM API |
| dm.service | wccRidcUrl | The URL that the DM API calls to communicate with WCC RIDC web services |
| swagger.endpoint | url.schemes | URL for Swagger documentation: location of the presentation schemes |
| swagger.endpoint | url.host | URL for Swagger documentation: location of the API service |
| swagger.endpoint | url.basePath | Location of the DMS-API |
| webade-oauth2 | viewer-ui.client.secret | The password for the Document Viewer UI service client |
| webade-oauth2 | dm-rest.client.id | The DMS service client |
| webade-oauth2 | dm-rest.client.secret | The password for the DMS service client |
FOI Request Process
FOI requests are usually submitted by citizens. FOI requests for B.C. Government ministries and the Office of the Premier are centrally managed through the Information Access Operations office (IAO). The IAO logs incoming FOI requests and forwards them to the ministries that may hold responsive records. The ministries in turn determine which of their programs may hold the responsive documents. Each program within a ministry searches the records within their custody and control for responsive documents. Document Management Service is a source location for records within NR environment.
NRM Records Management users access the DM document repository to locate responsive records pertaining to FOI requests. The Records Management users access the DM document repository via WCC. Users perform the following tasks to search, locate, and download responsive records.
Log-in to WCC
The results from an NR FOI search are stored in an FOI Folio folder at the root of each LOB Document Management engagement folder structure. The FOI Folio folder is accessible from WCC only; therefore, you need to access the WCC Server to search, store, and retrieve NR records pertaining to an FOI request.
The access permissions for WCC are granted and controlled using WebADE scopes and roles. Only users with applicable permissions can access WCC.
- Log in to the Oracle WebCenter Content Server from your internet browser.
- Enter your credentials and click Sign In. The Oracle WebCenter Content home page displays.
Search for Documents
When searching for documents in support of an NRM FOI request, you can search for documents using either the NR Document or FOI Folio search options.
During an FOI request search operation, Records Managers or FOI Searchers normally search for documents classified as NR Documents only. NR Documents are those documents that have been classified under ARCS and ORCS, which are mandatory for all documents managed through Document Management Service. When using the NR Document search, the form displays the metadata search criteria options established for the NR documents uploaded to WCC using Document Management Service.
A Records Manager can also search FOI Folios for documents already saved to a folio as part of a previous search request. The folios contain groups of links to documents from various locations in the DM document repository. The folios keep the list of documents in one place regardless of document location and enable the Records Manager to download copies of all documents simultaneously.
-
Click Search from the WCC menu toolbar and select NR Document or FOI Folio. The screen displays the selected search form.
-
Enter your search criteria using Metadata Search, Full-text Search, or a combination of both.
Note: The Engagement ID field in the Metadata Search area is the ID of an application request submitted by a client from the NR Online Services portal.
-
Set the search Results Options by adjusting the number of search results per page and the field sort order. The search is saved to the My Saved Queries tray.
Note: If you are going to reuse the search, you can save it as a query. Click Search Actions, select Save Search, enter a name for the query, and click OK**.
-
Click Search. The Search Results screen displays the results from a search operation. A successful search displays a list of documents with a link to each document. If the search returns no results, the message Found 0 potential items displays.
Creating Folios
Folios enable you to assemble, track, and access groupings of links to all the documents found as part of the FOI request search. As you discover responsive documents, you can save links to the documents in folios.The document links are saved in one place, regardless of where the document is located in the DMS document repository. You can Add Documents to an Existing Folio or Create a New Folio and Add Documents. All of the can download copies of all the documents in a folio can be downloaded in a single operation.
For new folios, you can create the folio in either the NR Documents or FOI Folio folders in the DM document repository in WCC.
Add Documents to an Existing Folio
- From the Search Results screen click the check box for each document you want to add to the folio.
- Expand the Actions menu in the search results toolbar and select Add Items to Folio. The Add Items to Folio window opens.
- Select Existing Folio and click Next.
- Select the profile (NR Document or FOI Folio) and click Next. The Search for Existing Folio window displays.
- Enter your search criteria using Full-text Search, Metadata Search, or a combination of both.
- Set the search Results Options by adjusting the number of search Results Per Page and the Sort By options.
- Click Search. The Folio Listing window displays.
- Click Select beside the desired folio.
- Expand the Actions menu and select Save Changes.
Procedure 3.2 – Create a New Folio and Add Documents
- From the Search Results screen click the check box for each document you want to add to the new folio.
- Expand the Actions menu in the search results toolbar and select Add Items to Folio. The Add Items to Folio window opens.
- Select New Folio and click Next.
- Select Simple Folio and click Load Folio.
- Expand the Actions menu and select Save Folio.
- Ensure the folio Profile is set to None and click Next. The Folio Check In window displays.
- Fill in the form to provide the details for the new folio. Ensure that all mandatory fields (marked with an asterisk) are completed.
- Click Check in.
- Select a navigation option from the Folio Check In Confirmation window and click Finish.
Download Documents
The Records Manager function in WCC can download the documents in a folio in a variety of formats. All documents in the folio are included in the download, consolidated in a single file.
- Navigate to the folio containing the documents you want to download.
- Expand the Browse Content tray.
- Click the Folders folder. The content displays in the work area.
- Click the FOI folder. A list of available folios displays in the work area.
- Click the Edit Folio icon in the Actions column for the folio you want to view.
- Expand the Renderers menu and select a download option. The options are:
- Download Zip Rendition: Download a compressed (.zip) file of all folio content.
- Download PDF Rendition: Download all folio content that has a PDF version available, consolidated into one PDF file.
- Download XML Rendition: Download an XML file articulating the folio hierarchy.
- Download PowerPoint Presentation: Download all folio content that has a PowerPoint version available, consolidated into one PowerPoint file.
- Download to workspace: Download a compressed (.zip) file of all folio content to your local workspace.
- Follow your internet browser’s on-screen instructions to download and save the selected file.